Showing posts with label Maintenance Guide. Show all posts

Monday, December 10, 2012

Tinting Your Car’s Windows

There are several tangible benefits of tinting your car windows. This is one accessory whose versatility and cost means it can be applied to any car. That said, before tinting your car windows, you must be familiar with the window tinting laws for your state.

Good window tinting film is resilient and almost maintenance free. They provide your car with an excellence finish, protect color and also provide an anti-scratch coating. Apart from this there are many other benefits you can get, read on to know.

1. The key benefit of tint application is to prevent the harmful sun rays. It provides up to 90% light and infrared rejection, which not only protects passengers but also keeps the car’s interior in pristine condition.

2.It helps to maintain the interior of your car at a cooler temperature and thus helps reduce fuel-consumption and running cost of your car because a car that is cool from inside uses less fuel to run an air conditioning system. .

3. Window tints also blocks nearly about 99% of the UV rays that acts as a sunscreen for the vehicle and reduce the causes of fading. As the entry of ultra violet rays is blocked, tinting helps preserve the interior integrity of your car and maintain its resale value.

4. Reducing the amount of UV rays also reduces the risk of skin cancer, early aging, and other harmful effects of UV rays on the health.

5. Non-tinted glasses are more likely to breakage during the event of an accident. The tint film holds all the shards of glass together and prevents flying glass from injuring the occupants of the car.

6. Tinting provides you privacy and also helps in reducing the risk of theft as outsiders will not be able to have a sneak peek into your car.

7. It also reduces the amount of dangerous glare from environmental elements like bright sunlight, rain storms and also other elements like approaching headlights, which indirectly offer a safe drive.

8. Delivers a sleek appearance that gives the car a classy, stylish look, car window films also help increase the comfort level of the car passengers.

Window tinting not only has all of the above advantages but will also improve the aesthetic appeal of the car exterior. So, stop waiting and tint your car’s windows today so you can reap the benefits of window tint!

As per new Rule :
Only car windows that have been tinted by the manufacturers are allowed; besides this, all vehicles with any percentage of tinted film have to remove it, even if it is within permissible limits - 70% transparency in the front and rear windows and 50% transparency on side windows.

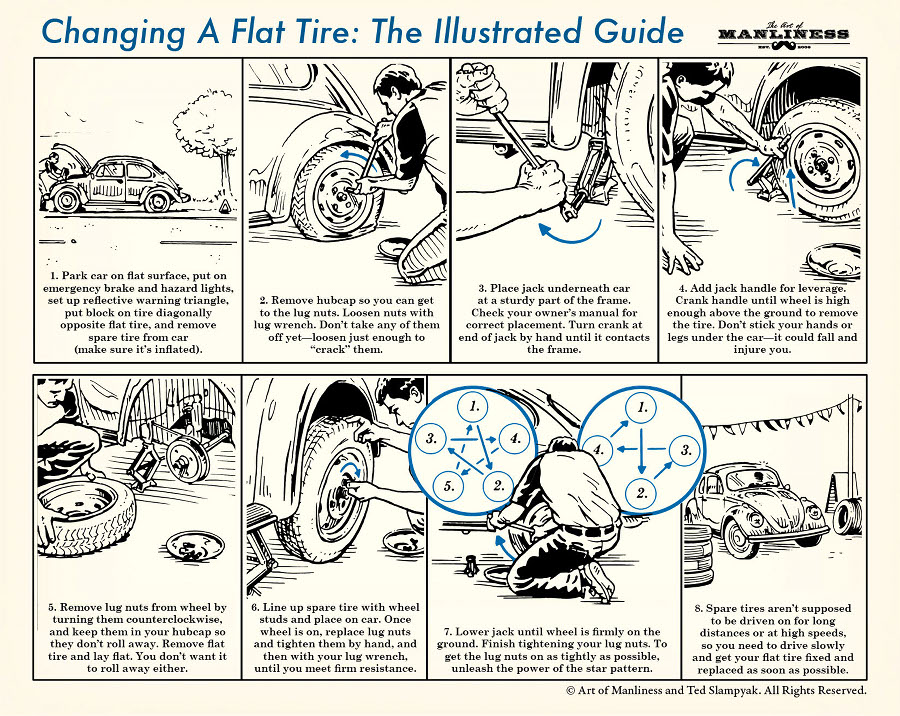
10 tips for Changing a Tyre

Tyres are the only component in a car’s whole body that continuously keeps in contact with surface and because of it they remain highly prone to the faults and deformities. That is why, it is very essential for every car owner to have knowledge of how to change a flat tyre. Knowledge not only makes you self dependent but also fall very essential when tyre of your car burst’s out during a long journey. Below are few tips for changing a car tyre.

Source: http://content.artofmanliness.com/uploads//2012/08/Changing-Flat-2.jpg

1) Remember, changing a tyre is not possible without the help of a number of right tools including a jack and a wheel brace.

2) Whenever, the tyre of your car goes flat, the first step should be pulling it over to a safe area (away from traffic). Also, don’t forget to turn on the hazard / parking lights and applying the hand bakes. To be on safer side, put a rock piece or a brick beneath the other side tyres of the car.

3) The first step should be getting down on your knees and try to find small grooves where the jack needs to be positioned. Now, try to shift some of the vehicle’s weight from flat tyre by turning the handle slowly.

4) Keep in mind that while changing a car tyre, applying right technique much more crucial than using your strength.

5) Unfasten the nuts of the tyre you are going to replace before applying jack. For loosening-up the nuts place the wheel-brace on any of the nut and turn it anticlockwise. You might have to fit on the nuts in case it refuses to budge easily.

6) Now slowly jack-up the car so that the tyre can be inflated fully.

7) Lift the wheel out of the car after removing all of the nuts. Again if wheel refuses to come out due to corrosion, install it back on a single nut and give it a good kick so that it can easily come out.

8) Now care fully put the new tyre into the bolts keeping the air valve’s face on your side. First tighten all the bolts with your hand and than use a small pinch of wheel brace to tight them further. Don’t tight nuts fully at this step as the car is yet to jacked-down on that wheel.

9) Now care fully jack down the car and use full strength to tighten the nuts further.

10) Don’t forget to remove the rock / brick to which you had placed beneath the tyres. Also carefully place the jack in side the car on its original place.


Cleaning Car Interior

Many people go to professionals to get their car interiors cleaned. They charge lots of money for this job. However, if you learn how to do it you can do so easily on your own. So, here are some useful tips for keeping your car’s interior clean and well maintained.

Remove the floor mats and shake them out well to remove loose debris. Take a vacuum cleaner to clean the seats and the floor. Using the proper attachment, reach around the pedals, under the seats, and the area between central console and front seats.
 
Take a soft brush and attach it with vacuum cleaner. Now clean the dashboard, leather seats and stereo properly. Be careful not to damage vents, knobs and sticking parts.

Use a spray cleaner for seats and door. You need to just spray and rub very well. You can also use laundry detergent as well instead of spray. Just add a small amount of mild detergent to warm water and squeeze a sponge or cloth into it. Use the damp cloth to wipe the upholstery and rub harder on very grimy areas. Hereafter, just dry it off completely. Ensure there is no spilled water in your vehicle as it will cause mold, corrosion, etc.

Repeat the same process to clean the carpet. Do not soak the carpet in water, it will cause corrosion and mould smell.
 
Now its time to clean the dashboard and other plastic or timber part of your car. Clean your dashboard with multi-purpose cleaner and a moist cloth. Dry the dashboard off thoroughly with a clean lint free dry cloth. To make it shiny, use a polish for plastic.
 Lastly, clean all the windows from the inside and outside. Use a suitable glass cleaner to wipe the interior of the windshield and the windows. Try not to dab with a rough cloth as it may cause scratches.
 
Finish off with a quick spray of air freshener and enjoy a ride in your freshly cleaned car !

Sunday, December 2, 2012

How to Properly Check Your Fluids


Part of keeping your vehicle in tiptop shape is to make sure you regularly check your fluid levels. In fact, monitoring of these levels is vital to the health of your car. It’s a great idea to read your owner’s manual. There should be diagrams of the engine there that will show you where to check all the important fluids. It’s a great way to get an idea of where the vital fluids can be found. You can also use the internet to pull up a similar picture that can help you.
 
Engine Oil

1. You’ll find towards the front of the engine a cap marked “Oil.” Check your oil with the engine off. Remove the dipstick

2. Wipe the oil off with a rag

3. Put the dipstick back in

4. Pull it out and get your reading

5. There will be two marks on the dipstick – minimum and maximum – anything in-between means your oils good. Below the minimum and you need to add oil. In older vehicles it’s a good idea to check your oil every couple of weeks. In newer vehicles check monthly.

Transmission Oil

If you have an automatic transmission you will find a dipstick to check your fluid level. It’s usually found towards the back of the engine. There are different methods for checking transmission fluids, which can be found in the owner’s manual. For most vehicles they have to be running and the transmission needs to be in neutral or park. To get a true reading the transmission should be warmed up so take it for a short drive to bring it up to operating temperature. Checking the level follows the same steps as with checking the oil. Check annually.

Engine Coolant

You should never open the radiator cap when the engine is hot. You can be splashed by the hot coolant and suffer serious burns. The majority of cars have an overflow bottler with visible level markings. You should make sure your coolant is between these markings.

Power Steering Fluid

Your car uses oil to assist with the power steering. This fluid should be checked regularly. Often it is checked at the pump but sometimes the reservoir is separate and away from the pump.

Brake Fluid

Most of the newer cars allow you to check the brake fluid levels without ever having to remove the master cylinder cap. There marking on the side of the reservoir identifying the different levels. When you are removing the cover be careful none spills on the paint as it lifts paint quickly.

Windshield Washer Fluid

You’ll see the jug that contains the blue liquid that’s magical for keeping your windshield clean. Most of the reservoirs are visibly marked. However, in some of the newer vehicles the reservoir is buried making it hard to see. Just pull the top off and start filling – you can’t hurt anything if you it overfills. A funnel can make it much easier to fill your washer fluid and other fluids as well.

How to wash a car


What can damage your car’s paintwork?

The following factors can really take the shine off your car.
  • UV rays from the sun causing discoloration and fading
  • Acid rain or salt water causing oxidation (or rust) and ‘spots’ on the paintwork
  • Bird droppings which can stain and corrode the car if not quickly removed
  • Paint chips caused by loose gravel from the road
  • Scratches caused by brushing against the car, improper washing or drying.

Fortunately most are preventable and all are treatable. Bird droppings, for example, are highly acidic and the best advice is to avoid parking under trees and to always remove the dropping as soon as possible with a wet tissue.

The essential car wash

It is ironic that the act of washing your car itself that can lead to most of those fine scratches that can mar the paintwork. You should avoid machine car washes which will get your car clean only at the cost of damaging its delicate paintwork.

Here are the seven steps on how to wash a car.

  1. Washing-up liquid is for dishes only - if it is used on your car it will dull the paint and cloud its finish. Pick up some car wash soap that is designed to clean dirt and grime without stripping the protective waxes and other compounds that give your car its shine.
  2. Rinse the car down to remove grit and dirt that could be ground in to your car as you wash. Use a hose on its finest setting to avoid a powerful spray embedding dirt deeper and scratching your car.
  3. A mitt rather than a sponge is best to clean with – it will help you to avoid dragging the dust and dirt that adheres to the surface of sponges and can scratch your paint.
  4. You will need two buckets. One with your wash solution in and the other with just clean water to rinse off your mitt.
  5. Always work from the top down to avoid moving dirt from the dirtier, lower part of the car to the cleaner top. Always use side-to-side strokes and light pressure.
  6. When finished rinse the car off once more.
  7. Leaving your car to dry in the sun will leave a patchy effect on its paint so dry it down with a microfiber towel, which is more absorbent than the traditional chamois leather.

Finishing touches: polish and wax

Polishing your car and waxing it are not the same. A polish will help get rid of surface abrasions in your paint, while waxing will ‘fill them in’ and make everything shiny. You should wax and polish your car sparingly as doing it too often and using too much wax or polish can do more harm than good. Remember that wax and polish restore the look of your car by gently removing the top layer of your car's paint, so be sparing when applying.

A wax and polish should be applied roughly every three months. You can always tell when a car needs polishing, as water no longer ‘beads’ on the paintwork. Waxing is like giving your car a sheet of armour that protects it from many of the dangers of the environment.

You should polish first and then wax as this makes the wax easier to remove. Apply both in the same way by using a cotton fabric gently rub polish on and then using a different, very clean cloth wipe the material off of the paint working on one side of the car at a time.
A good polish and wax will remove scratch marks, give your car an even colour and restore the lustre, gloss and shine to its paint.

Tricks of the trade: touch-up paint and detailing clay

Some further tricks of the trade to finish your car off perfectly are touching up parts where paint has been removed and making the whole of the paintwork as smooth and shiny as glass with detailing clay.
If you are touching up paint make sure you match the colour exactly: you will need the year, make and model of your car to do this. Clean the area on your car and clear any chipped or cracked paint. You need to sand down the area and a nick sander is perfect for small areas. It is like a pen with a small sandpaper tip.

You should use super-fine grade sandpaper with a rating of 1000 or higher for this. Wipe off sanding dust and grit with a clean cloth. Use a small artist's detail brush to smoothly fill in the shallow scratch or ding with touch-up paint. Alternatively you can use a toothpick which helps you apply paint precisely without being in danger of having too much on your ‘brush’. Sand your touch-up work down when dry to achieve a smooth, blended in finish.

If the paint of your car is very scratched and tired looking you may wish to use detailing clay before you polish and wax. Once the secret tool of professionals this miracle worker is now available widely. In the box you get a spray bottle of lubricant and a small bar of clay. You should break off a third of the bar of clay and spray the lubricant onto a small patch of your car’s bodywork. Applying very light pressure move the clay back and forth: you will feel it stick and then release as it removes all those contaminants (tree sap, road dirt, bird droppings) that regular washing can leave behind. It is a long job to do the whole car but you will be left with paintwork as smooth as a baby’s bottom and as shiny as new glass. Remember though that this also removes any polish on your car so you will need to polish after you have finished.


 4 Things You Need to Avoid
 
You may think a car washing is as simple as just grabbing the sponge, dipping it in a bucket of fairy liquid mix and off you go, but this is not the correct way. In fact if you’re washing your car this way, then you can expect the paint to look marred and could damage the paint completely. In this article I am going to tell four things that you should avoid when washing your car to extend the life of your car’s finish.

 
1. Don’t Wash the Car in Direct Sunlight

Perhaps the biggest mistake you can make when washing your car. Washing the car on direct sunlight can have a harmful effect on the paint. Each droplet of water will act like a magnifying glass. This produces small laser like beams that will make tiny pits on your car paint. The end result is an early chipping of car’s paint particularly in the front part.

 
2. Don’t Use household cleaners

Using household cleaners as a substitute for car wash preparations is not a good idea. Household cleaners like dishwashing soap, hand soap or window cleaner contain powerful stripping chemicals that can destroy your car’s paint if used excessively. You can use car wash preparations or shampoos that do not cost much higher than household cleaners.

 
3. Don’t Allow to dry Your Car in Air

Allowing you vehicle to dry without your involvement can cause water etching, which detracts from a shiny finish. This is caused by higher content of minerals in tap water. The water marks can be nasty and be very difficult to get rid of.

 
4. Don’t forget to clean Your Wheels

A greater care is required to a car’s wheels because they get more wear than any other part of a car. Many of us ignore to clean them because they will get soiled again as soon as we drive. However if you leave them unclean for a long period they can be very difficult to get rid of. You could use a pressure washer to clean the wheels.

If you start to avoid the things listed above while washing, your car will reward you with a long lasting finish. This might also help you prolong the life span of your car and increase it’s resell value. So ensure to take care of your vehicle’s finish by using these tips.